There he is ... very approachable look to him, ay? (Ignore how awful I look in this picture, it's from 2009. I am aware you could probably eat cereal from the dimples in my cheeks.)
Tuesday, November 20, 2012
A Glove Repair for Papa Bear
To get the humor in this (if you still find any in the first place) you have to understand my dad is NOT a touchy feely emotional kinda guy. I'll have to dig up a picture, his looks even show! (I've lived with him for years ... and I still find him to be kinda scary looking.) Anyhow, he asked me to fix a pair of his work gloves, he's a forklift driver for GM so I guess it kinda got worn down. I went to sew it with the handy dandy sewing machine only coming to find out I'd have to be such a doll and hand sew it. So I did ... and added a little extra embroidery to it, too! (My family calls me 'Tay' because my middle name is Taylor, sorry if that caused a bit of confusion)
Monday, November 19, 2012
Allison's 'Stachabulous Birthday!
Do you guys remember the mustache tutorials I posted? Well those 'stachabulous creations were given to my bestest friend, Allison for her 15th birthday! She has a rather odd obsession for them. I'll have to get a picture of her George Washington impersonation sometime. Greatest thing you ever did see. Anyway, I thought those tutorials deserved a follow up picture. ... Yes, she did have one 'stachabulous birthday! :{D
Monday, November 12, 2012
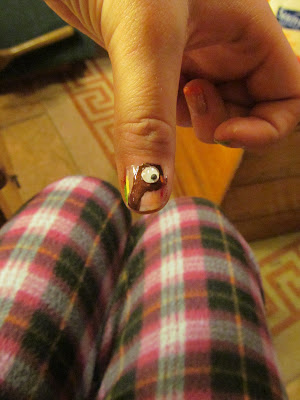
Turkey Nails
GOBBLE GOBBLE!!! Oh yes, it's that time of year again. You know what I'm talking about ... the gathering of your obnoxious family around delish food. Did I say obnoxious? I meant lovely! To go with that chipper holiday spirit of mine, I did my nails. Posted in time for yours truly. (See, I'm getting better!) :D
Happy (early) Thanksgiving!
Sunday, November 11, 2012
Pleating & Skinnifying Pants
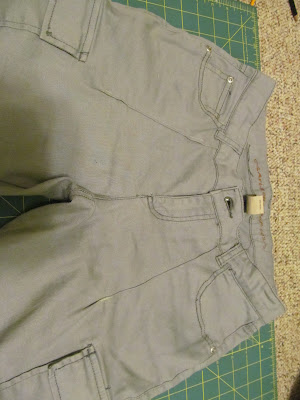
First off, by skinnifying I mean making pants tighter at the ankle into more of a skinny leg fit. Now that that's settled I'll start the tutorial! You know those pants that would be absolutely adorable, but they are extremely baggy at the legs? Pleating is such a great way to fix that in a really cute, simple way. The pants I'm using in this tutorial are not a jean material, they're a soft cotton.
You will need:
coordinating thread
Pleating
Step 1: Find the middle of your pants and make a mark (unless you want your pleat to be off center) and stick a pin in. Be sure that your pin only goes through the front side. (I reallllllyyy need to figure this rotater thing out... Sorry again.)
Step 2: Measure 1/4" from your first pin. You can measure in either direction just make sure that it is in the same direction for both legs, then pin. From these pins place two more, inches below.
Step 3: From the waistband again, measure the length you'd like your pleats to be and place a pin horizontally. This will be your stopping point when you decide to sew.
Step 4: From one of the pins fold over so that it lines up with the second pin. Do this all the way down the pant until you reach the horizontal pin. Pin the fold in place.
Step 5: Sew along the pins. Start from the waistband, just not on the waistband. Then sew all the way to the horizontal pin. (My pin representing the stopping point is the pink one.)
And there we have it, a professional pleat!
Skinnifying
Step 1: Flip pants right side out. Place a pair of skinny jeans that you like the fit of and place them on top of your unskinnified jeans. Place pins on the outside of your skinny jeans along the inseam of the unskinnified jeans.
Step 2: Being really super duper careful try on your jeans inside out, leaving the pins in. (Yes, inside out WITH the pins in. Scary, yes. But that's why I said be careful!) If you like the way they fit sew along the pins. Be sure to double stitch at the bottom of the pant.
Step 3: Try them on right side out. if you're happy with the fit turn them back out and cut a centimeter or so away from your seam.
not skinnified skinnified
Step 4: Repeat on the other pant leg. Then you have a once ill fitting pant transformed into a healthy fitting pant. (Cheesy joke, I know.)
before tailoring
after tailoring
Thursday, November 8, 2012
Simple Canvas Clutch
Again, this if for my dearest friend Allison. (Yeah, the one with the crazy weird mustache addiction.) She always complains about not having a purse, but not wanting one because of the way they look, so I decided I'd take matters into my own hands and make one that's totally her!
Step 2: Fold all the selvage edges down and pin. I folded the left and right down first. Pinning a little less than a half an inch.
Step 3: Sew all of the pinned selvage edges so that they match the folded edge.
Step 4: Turning the fabric long ways, with sewn edges facing down. (I know my sewn edges are facing up, but ignore that. I obviously did some seam ripping ... grr.)
Step 5: Measure 10" from the top and make a light mark. This will be your crease, where you fold the fabric. Once you fold the fabric the selvage edges that you sewed will be facing you. Pin about 1/2 " from the edges.
Step 6: Sew along the pins then turn the fabric right side out so that you cannot see what you have just sewn.
Step 8: Pin the fabric on the flap down so that it is smooth and even with the rest.
Step 10: Iron the flap down, so that it looks like the picture below. After this you can choose to add a button, or just leave it as is. If you go on to read I painted a pattern on the fabric and added a button to fasten it closed.
To make the mustache design I cut out a mustache and measured the middle of the fabric. From there I squirted fabric paint on a piece of cardboard and painted on the stencil of the mustache I made. I decided to make it multi-colored in a diagnol pattern. Then added a button. To do that I measured where I wanted the button then lifted the flap and stitched the button on the opposite piece of fabric. On the flap I cut a hole that would aquire the button.
You will need:
1/2 yard of fabric
coordinating thread
button
Step 1: Fold fabric in half, folded age nearest to you. If you want to go off of my dimensions I measured 10" up from the fold and 19" wide. (Once again, I do apologize for some of the pictures being rotated wrong. I changed them before I uploaded, but you know ... technology these days. sigh)
it should end up similar looking to this
Step 2: Fold all the selvage edges down and pin. I folded the left and right down first. Pinning a little less than a half an inch.
Step 3: Sew all of the pinned selvage edges so that they match the folded edge.
Step 4: Turning the fabric long ways, with sewn edges facing down. (I know my sewn edges are facing up, but ignore that. I obviously did some seam ripping ... grr.)
Step 5: Measure 10" from the top and make a light mark. This will be your crease, where you fold the fabric. Once you fold the fabric the selvage edges that you sewed will be facing you. Pin about 1/2 " from the edges.
Step 6: Sew along the pins then turn the fabric right side out so that you cannot see what you have just sewn.
Step 8: Pin the fabric on the flap down so that it is smooth and even with the rest.
and sew.
Step 10: Iron the flap down, so that it looks like the picture below. After this you can choose to add a button, or just leave it as is. If you go on to read I painted a pattern on the fabric and added a button to fasten it closed.
To make the mustache design I cut out a mustache and measured the middle of the fabric. From there I squirted fabric paint on a piece of cardboard and painted on the stencil of the mustache I made. I decided to make it multi-colored in a diagnol pattern. Then added a button. To do that I measured where I wanted the button then lifted the flap and stitched the button on the opposite piece of fabric. On the flap I cut a hole that would aquire the button.
And there we have it ... another 'stache-abulous creation! :{D
Wednesday, November 7, 2012
Giraffe Nails
When I went to the doctor's office I found out that I was two inches taller than I thought, so later that night when I went to do my nails I decided to do something that added height. (Ha ha, get it? Giraffes are tall?) Anywho, their really cute and easy to do. Start with darker base coat and then add in lines with a lighter color.
Halloween Nails
Yes, I'm fully aware that Halloween is over, but how could I not share these darling little punkin' nails? Exactly, I couldn't. Maybe next year I'll post in time!
Tuesday, November 6, 2012
Boiler Up!
This girl right here is Purdue's #1 fan. To start off basketball season I did my nails for them. Which, unfortunately, has not improved their game. :(
Monday, November 5, 2012
Mustache Pillow
At the end of the week is my best friend, Allison's birthday. She has an obsession (I stress obsession) for mustaches. Why? Nooo clue. Anyways, I was kinda stuck on what to get her. I wanted it to be something no one else would get her yaddi yaddi ya ... And somehow I came up with a 'stache pillow. Cool? I know. :)
So if you wanna join in on the weirdness of sleeping with facial hair it is my pleasure to present you this tutorial!
Step 4: Fold the paper in half hamburger style, if ya know what I mean. (Left to right) Sketch sort of a paisley design starting at the dot. It will look a little weird, but hang in there. Once you cut it out it'll surprise you how mustache like it really does look.
Step 5: Cut along your marked area. Unfold and WALLAH! You have a giant 'stache. Try it on for size ... I did! :)
Step 6: After any adjustments and trimming (ha ha, get it? :)) fold back in half and line up the pattern on the folded edge of your fabric.
Step 7: Cut, and repeat Step 5 so that you have two mustaches. (Sorry for it being rotated the wrong way. Apparently my rotater is broken!)
Step 8: Pin right sides together and sew. Be sure to leave 4 inches or more depending on the width of your hand so that you can stuff it. I left the opening at the bottom of the mustache where it comes up.
Step 10: Here comes the least favored part .... hand stitching. Double sad face. :( :(
Using coordinating thread sew the opening shut being sure it's secure.
And WALLAH! You have a 'stache-abulous pillow! :{D
So if you wanna join in on the weirdness of sleeping with facial hair it is my pleasure to present you this tutorial!
You will need:
1/2 yard of fabric
Stuffing
Coordinating thread
Paper & scissors (for the pattern)
Stuffing
Coordinating thread
Paper & scissors (for the pattern)
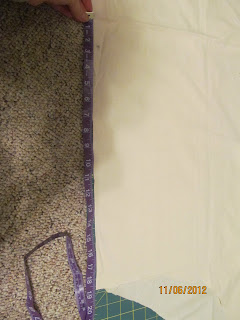
Step 1: Measure the width of your mattress, in my case I was measuring for a twin which is 36 inches wide. You do not have to measure it accordingly to your bed, but I did so it would sit nicely in the middle. However, you can make it as long as your little heart desires.
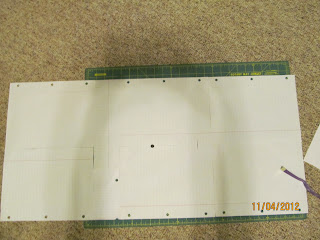
Step 2: Because I totally spaced at Hobby Lobby last weekend and didn't get a long roll of paper for pattern making I had to improvise and I duct taped loose leaf notebook paper together. Hillbilly, I know.
Step 3: Cut the paper to your desired width leaving at least two extra inches. Measure the center of the paper and make a mark. See that black dot? Yup, that's the center.
Step 4: Fold the paper in half hamburger style, if ya know what I mean. (Left to right) Sketch sort of a paisley design starting at the dot. It will look a little weird, but hang in there. Once you cut it out it'll surprise you how mustache like it really does look.
Step 5: Cut along your marked area. Unfold and WALLAH! You have a giant 'stache. Try it on for size ... I did! :)
Step 6: After any adjustments and trimming (ha ha, get it? :)) fold back in half and line up the pattern on the folded edge of your fabric.
Step 7: Cut, and repeat Step 5 so that you have two mustaches. (Sorry for it being rotated the wrong way. Apparently my rotater is broken!)
Step 8: Pin right sides together and sew. Be sure to leave 4 inches or more depending on the width of your hand so that you can stuff it. I left the opening at the bottom of the mustache where it comes up.
Step 9: Turn the mustache so that the right side of the fabric is out. Begin stuffing starting at the tips and working your way towards the hole. There is no right or wrong amount of stuffing to use. I wanted mine to be stiffer, more for decoration rather than comfort to sleep on.
Step 10: Here comes the least favored part .... hand stitching. Double sad face. :( :(
Using coordinating thread sew the opening shut being sure it's secure.
And WALLAH! You have a 'stache-abulous pillow! :{D
Hello Hello!
I'm new to this whole blog thing, so I apologize if it's not the neatest, most well put together thing out there, but I'm trying! I'm sixteen with a love for high fashion, but with high fashion comes a high budget. Which being only sixteen ... I do not have. So in competance I try to make whatever I possibly can which I hope to share with you all! So hang in there and we'll figure this out! :)
With craftiness,
Shelby
With craftiness,
Shelby
Subscribe to:
Comments (Atom)


.jpg)
.jpg)


